
Also serving the communities of De Luz, Rainbow, Camp Pendleton, Pala and Pauma
Also serving the communities of De Luz, Rainbow, Camp Pendleton, Pala and Pauma
Nature lies fallow in winter in preparation for the new year. All life needs rest in order to grow with greater strength. Winter is the time of withdrawal that precedes renewal. But now it's time to take a few simple steps to get your roses off to a great year!
There is no magical specific date to prune. According to all accounts and professional rosarians, the proper time is "late winter." This has many meanings-bottom line, you want to prune late enough that there's little risk of frost damage to the tender growth that will emerge from pruning. In the Temecula Valley, last average frost date is March 31, so that means you're probably safe pruning in mid- to late-February. Of course, it's always a gamble.
The best advice is to watch the weather. Generally speaking a little later is best when we've had winter rain since the rains are cold and the ground is wetter and colder than usual. Different parts of the yard may have other conditions. A south facing wall backing the plants will be warmer than a shadier area. The composition of the soil will have differing effects. Whether there is still a generous later of mulch can effect soil conditions.
After this pruning, you can usually expect a flush of blooms 8 to 12 weeks later, depending on the temperatures during that period – the warmer it is, the shorter the time to blooms. But all things being equal, if you prune in the latter half of February you will likely have blooms for 2017 rose shows scheduled in mid- to late-April. If you would like blooms for a specific date, count backwards approximately 10 weeks from that date. Pruning should be complete on this date.
The main reason for the major late-winter pruning is to reset the plants' biological clock. A wake up call to begin a new life cycle–like restarting a factory.
The following procedures mostly apply to hybrid teas and floribundas, but are reasonably serviceable for minis. They are not really applicable to climbers, ground cover roses, trailers, or shrub roses – all those types have their own pruning methods.
In general, it is recommended that you have good pruning tools and gloves with arm protectors, sharp clean bypass hand pruners, and long handle loppers is recommended. One needs to have a range of pruner sizes handy. Each size has a limit to the diameter thickness for which it is most efficiently used; using too small a pruner on too large a cane can damage both. At minimum, have a pair of loppers and a standard-sized pair of hand pruners that fit your hand size.
If you have some older plants with large canes that may need to be removed, a saw is a handy tool to have. All pruners should be kept clean, sharp, and in good repair. Rubbing alcohol is ideal for cleaning pruners, before and during the job.
It also helps prevent transmitting diseases from plant to plant, and you can use it as first aid for punctures and scratches to your skin. A good pair of leather gloves are necessary with long sleeves or separate pair of sleeves to protect our arms.
Before starting the job, lubricate the moving parts with a little light oil (such as 3-in-1 oil), and make sure they operate without resistance. Sharpen each blade with a small diamond file (available at garden centers), trying as much as possible to match the original bevel of the blade. Every 100 cuts or so, swipe the file over the blade a few times to keep it sharp.
If you notice that the pruners are crushing the stems and/or leaving a tail, it's past time to sharpen! To minimize damage to the cane keep this rule in mind; the sharp blade should always face the part that will be left. This will minimize the crushing of the cane or stem as it will be the part that is discarded. This rule works for preparing stems for arranging or putting into a vase.
Now, decide what style of pruning you feel comfortable with (Figure 1). I find this works well with the way buds are distributed along the cane. Buds are found in the "axil" where a leaf meets the cane; leaves spiral around the cane at about 1.5" intervals. This places outward-facing buds about 4" apart. If you prune lightly to moderately, and if frost damages the tender young growth, then you can still re-prune to the next bud down.
In Southern California our rose bushes can grow quite large, so start with some gross pruning to bring the project down to size. I use loppers to cut every bush down to about 3 feet high. This lets you examine the structure of the bush, and to use your hand pruners to more easily remove canes that are twiggy, dead, crossing other canes, or passing through the center of the plant.
Also remove old leaves as you go along so you can easily see the structure of the plant. After removing all that stuff from the interior of the bush you can do the final pruning. Attempt to leave a domed top to the degree possible so the plant will bush out in a pleasing, balanced manner.
There are two kinds of cuts you will make. Some cuts remove the entire branch; these cuts are made flush with the surface of the parent cane. Other cuts simply shorten a cane. It is important to position your pruners so you minimize damage to the plant.
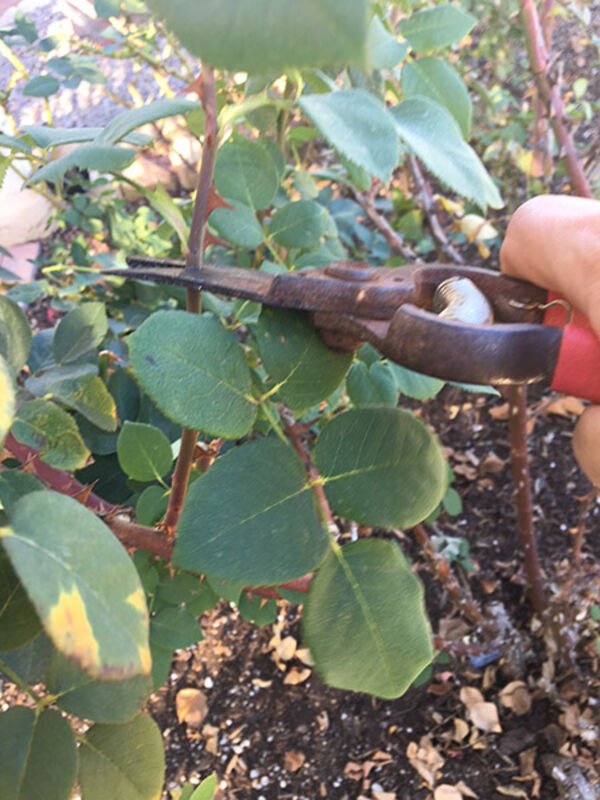
Take a look at your pruners and notice that they have a sharp cutting blade (which slices through the cane), and a dull curved non-cutting blade (which holds the cane in place during the cut). These are called bypass pruners, the only type recommended.
Position your pruners so the non-cutting blade is in contact with the portion of the cane that will be removed, and the cutting blade is on the side of the cut that will remain on the plant. (See Figure 2.) This will make more sense when you are actually holding the pruners and getting ready to cut! Also, always prune above an outward facing bud with an angled cut. (See Figure 3).
A word of caution when pruning: Look for the small nests of hummingbirds, as this is the nesting period for two varieties in our area. Also, if you discover praying mantis egg cases on any branches you remove, find a place to put them where they will be undisturbed and hatch out so you can benefit from the offspring!
Be sure to dispose of all cut off material into your green waste bin and put it on the street. Clean the ground thoroughly of all rose debris. Apply a dormant spray to the plants and the soil surface to ward off diseases. Then add 2"-4" of composted mulch to cover the entire garden area.
The first fertilizing will be when new growth is about 2 inches long. I recommend lower values of the three elements ( Nitrogen [3], Phosphate [4],K Potassium [3]) with slightly higher value for Phosphate. In two weeks begin with heavier feeding every 2 weeks for great blooms or at least monthly. Now would be the best time to asses the irrigation system for any needed repairs while there is no new growth and mulch has not been spread.
Be sure to visit Rose Haven, located at 30592 Jedediah Smith Road (the cross street is Cabrillo Avenue) in Temecula. as well as the web site, http://www.TemeculaValleyRoseSociety.org.


Reader Comments(0)