
Also serving the communities of De Luz, Rainbow, Camp Pendleton, Pala and Pauma
Also serving the communities of De Luz, Rainbow, Camp Pendleton, Pala and Pauma
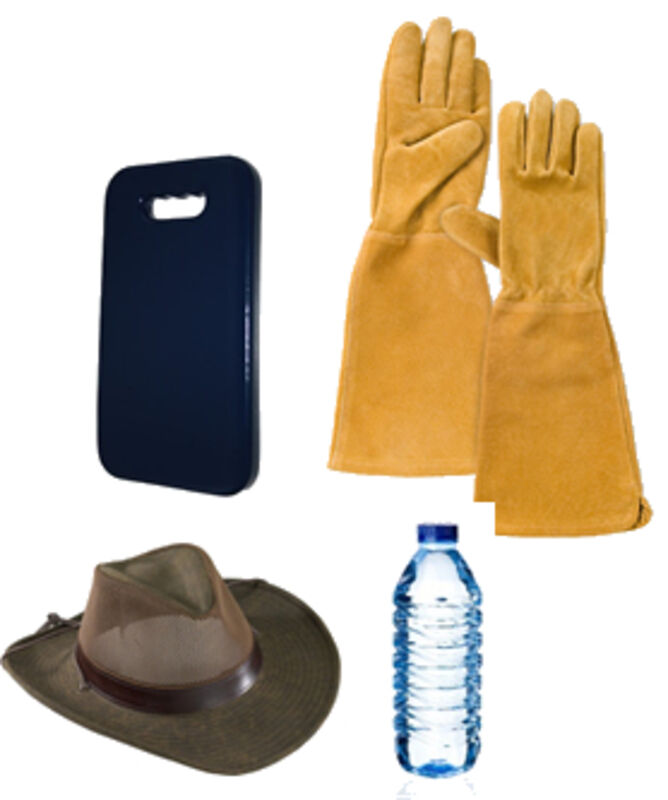
Useful protective equipment when pruning roses are gloves with arm protectors, a hat, a kneeling pad and drinking water.
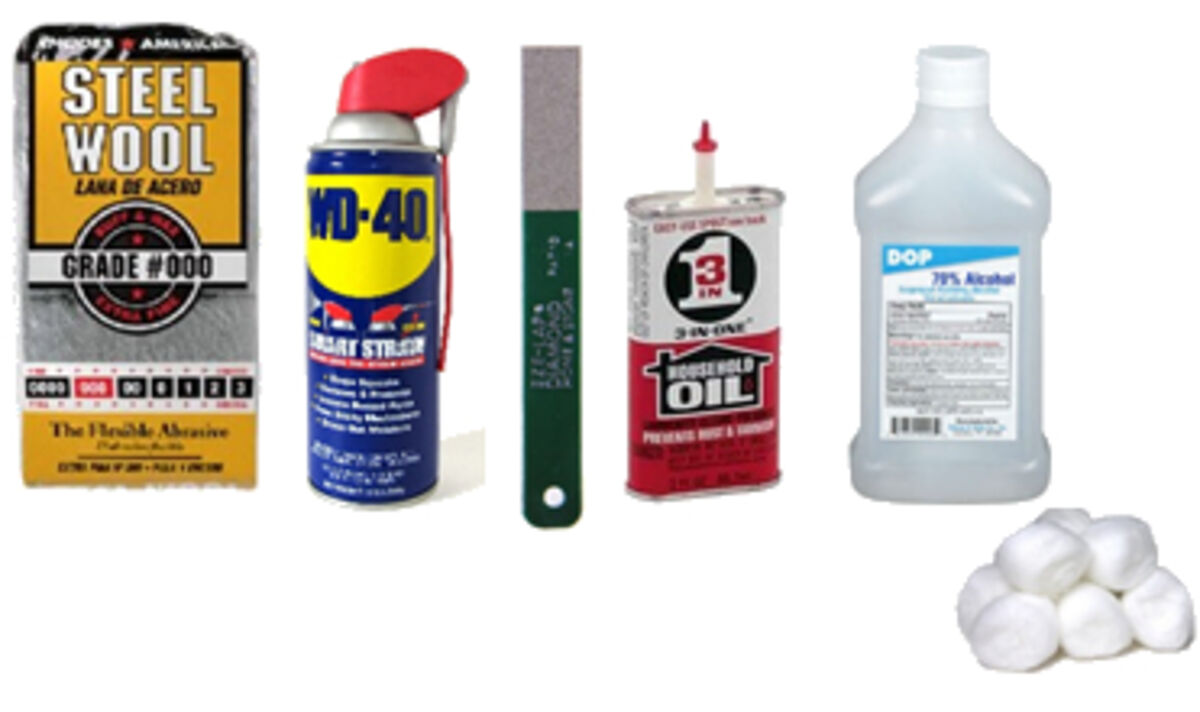
Useful tools for cleaning pruning tools include steel wool, WD-40, a fine diamond file, rubbing alcohol and cotton balls.
Frank Brines
Master Rosarian
In Southern California, winter is usually short and sometimes confusing. Winter for some plant life is a time of withdrawal that precedes renewal. For roses it is necessary to help them in that process. Now is the time to perform a few procedures to help reset the hormonal clock and get them ready for a great year of rose blooms. That's the main purpose for pruning.
According to experienced rosarians, the proper time for the major annual pruning is "late winter." This has many meanings in an area like So Cal which has numerous weather zones. Bottom line: Prune late enough to avoid risking frost damage to the tender growth that will emerge as a result of pruning.
After this pruning, you can usually expect a flush of blooms 8 to 12 weeks later, depending on the temperatures during that period – the warmer it is, the shorter the time to bloom. But all things being equal, if you prune in the latter half of February you will likely have blooms in mid- to late-April.
If you want blooms for a specific date, count backwards approximately 10 weeks from that date. Pruning should be complete on this date.
In most of our region the last average frost date is mid-March, so that means you're probably safe pruning in mid- to late-February. It is always a gamble and the best advice is to watch the weather. If there is winter rain during January/February, pruning can be held off awhile since these rains are cold making the ground colder and wetter than usual.
If you haven't begun or finished pruning by now, don't fear: There is still plenty of time to have blooms for rose shows or special spring events!
Classes of roses
Different classes of roses benefit from different styles of pruning. This month's column presents pruning techniques that work well for the first five classes listed below. The rest have their own specific pruning needs but won't be harmed by following the methods described here.
1. Hybrid Tea Roses (HT): You can think of these as "florist roses." They are typically medium to tall (4-8 feet), with large buds borne on long stems with elegant high centers before opening, and 30-50 petals. If the blooms are consistently removed, most hybrid teas will produce a new "flush" of blooms every six to eight weeks. The ideal shape for a hybrid tea bush is an urn or vase shape.
2. Floribunda Roses (Fl): These are typically short to medium height (3-5 feet tall), bearing large clusters of flowers in a loose open style with 25-35 petals. They tend to bloom continuously through the growing season. The ideal shape for a floribunda bush is similar to a hybrid tea. They require less care and are ideal for beginner rose growers.
3. Grandiflora Roses (Gr): These are a subclass of hybrid teas but with floribunda features. They have elegant showy clusters of three to five blooms with nearly hybrid tea form and a constant bloom cycle like floribunda They tend to be larger and taller than hybrid teas.
4. Miniature Roses (Min): These most often have hybrid tea or Grandiflora flower form but are typically shorter and a bit more compact. True miniature roses grow between 15"-30" tall, whereas "miniflora" tend to be closer to the size of a floribunda.
5. Polyantha Roses (Pol): These are like floribunda but much shorter, with smaller, prolific blooms. They work well for edgings and hedges, and can be easily grown in pots. They are generally low-maintenance and relatively disease-resistant.
6. Shrub Roses: These tend to sprawl from 5' to 15' in every direction, producing abundant clusters of blossoms. There are many subcategories, including the "David Austin English Roses" and the "Iceberg" varieties. Pruning is relatively simple: First, inspect and clean out dead and diseased material from the center, then cut the shrub back to conform to the space you want them to fill by shortening canes and removing about one third of the growth.
7. Ground-cover Roses: Also called "landscape" roses, these are low-maintenance and well suited as space fillers. They sprawl outward but reach no more than three feet tall, are generally disease- and pest-resistant, and bloom continuously.
8. Climbing Roses: These are not a class, but more of a description – that is, there are climbing roses that are hybrid teas, Grandiflora, or floribunda They can't actually "climb" like vines, but they produce long, sturdy, upright and sometimes arching canes which can grow up to 15 feet, going beyond a trellis, fences, arbors or pergolas. They tend to produce more flowers on canes that have been tied to horizontal supports.
Getting your pruning tools ready
Before you prune, get your equipment in good order. Ideally, you will have these protective items: gloves with arm protectors, hat, water, kneeling pad and Band-aids. Also, assemble these cleaning supplies for your cutting tools: steel wool (0000), rubbing alcohol (70%), solvent (e.g., WD-40), cotton balls, paper towels, or clean rags and fine diamond file. You will also need these cutting tools: bypass hand pruners, long-handled loppers and a hand-held pruning saw.
The standard hand pruner is good for cutting canes up to one-half inch diameter; use your loppers or saw for anything thicker. Using your pruners on too large a cane can damage the cane and "spring" the pruner so it doesn't produce a clean cut. Likewise, don't overtax your loppers; the bigger the cane, the bigger your loppers need to be.
What does "bypass" mean? Compare your pruners to the image above: Bypass pruners have a sharp cutting blade with a curved outline (which slices through the cane) and a dull curved non-cutting bar (which holds the cane in place during the cut). The sharp blade "bypasses" the non-cutting bar. This is in contrast to an "anvil" pruner which has a straight blade that comes down on a straight bar.
Follow these steps to get your tools ready:
1. Clean all tools as thoroughly as you can with WD-40 and/or rubbing alcohol. During your pruning, cleaning with alcohol between plants can help prevent transmitting diseases. (Alcohol is also helpful as first aid for punctures and scratches to your skin.)
2. Lubricate the moving parts with a little light oil (e.g., 3-in-1 oil), and make sure they operate smoothly.
3. Sharpen each blade with a small diamond file (available at garden centers), trying as much as possible to match the original bevel of the blade. Every 100 cuts or so, swipe the file over the blade a few times to keep it sharp. If you notice that your pruners are crushing the stems and/or leaving a "tail" (a small strip of tissue sticking up from the cut) then it's past time to sharpen them!
Gross pruning
For all cuts, orient your pruners or loppers so that the non-cutting bar is in contact with the portion of the cane that will be removed, and the cutting blade is on the side of the cut that will remain on the plant. This will make more sense when you are actually holding the pruners and getting ready to cut.
A word of caution when gross pruning: Look for the small nests of hummingbirds, as this is the nesting period for two varieties in our area. Also, if you discover praying mantis egg cases on any branches you remove, find a place to put the cutting where it will be undisturbed and the eggs can hatch so you benefit from the offspring.
1. In Southern California our rose bushes can grow quite large, so start with some gross pruning to bring the project down to size. I use loppers to cut every bush down to about 3-4 feet high.
2. Next, remove all the leaves from the plant and discard into your green waste bin. This removes diseased material and helps you see the plant's structure clearly.
3. Use your hand pruners or loppers to remove canes that are twiggy, dead, passing through the center of the plant, or crossing (and in physical contact with) other canes; for those, remove the older cane.
Fine pruning
After removing all that stuff from the interior of the bush, you're ready to do your fine pruning:
1. Prune each cane to a height that you feel comfortable with, likely between 12" and 24" tall.
When pruning a cane, make the cut above an outward-facing bud; this ensures that the stem grows away from the center of the plant. The cut should be at an angle, with the "back" edge of the angle at least the diameter of the cane; this allows enough space for a new cane of the same size to emerge.
Note: There are always one to three buds wherever there is a leaf. "Outward-facing buds" tend to be from 3" to 6" apart. If you prune lightly to moderately – that is, if you keep your canes a little longer rather than shorter – and then frost damages the tender young growth, you'll still have some outward-facing buds to prune down to.
2. Attempt to end up with a domed top to the degree possible so the plant will bush out in a pleasing, balanced manner.
Clean and feed
Clean the ground thoroughly of all rose debris and dispose of all materials in your green waste bin: Do not compost it!
1. Assess your irrigation system and make repairs while there is no new growth and before spreading mulch.
2. Apply a dormant spray to the plants and the soil surface to ward off diseases/pests. Adding a horticultural oil can be beneficial as a surfactant. Read the directions for both carefully!
3. Apply 2 to 4 inches of composted mulch to cover the entire garden area, but leave about 6" clear around where the rose emerges from the soil.
4. Do your first feeding after about two to three inches of new growth has emerged. I recommend lower values of the three elements (e.g., Nitrogen [3], Phosphate [4],K Potassium [3]); note the slightly higher value for Phosphate which nourishes the roots.
5. Two weeks later, begin with heavier feeding every 2 to 4 weeks for great blooms. (We'll cover feeding in future columns!)
Be sure to visit Rose Haven, located at 30592 Jedediah Smith Road (the cross street is Cabrillo Avenue) in Temecula, as well as http://www.TemeculaValleyRoseSociety.org.


Reader Comments(0)